Case reports that convince – VITA PHYSIODENS in action
Our patient cases demonstrate successful use in full dentures, partial dentures, and implant prosthetics – with a focus on aesthetics, function, and patient satisfaction. From complex restorations to aesthetically demanding solutions – let yourself be inspired by case reports from your colleagues.
This case report describes the fabrication of full dentures for a 93-year-old deaf patient. Due to the pronounced atrophy of the jawbone and the lack of verbal communication, the decision was made against a fixed restoration in order to consistently minimize the number of treatment sessions and the amount of effort required for the elderly patient. The choice was made for a classic, conventional full denture workflow with mucodynamic impression and functional margin design. Communication with the patient was conducted using nonverbal techniques. This case highlights the importance of providing compassionate care that is tailored to geriatric patients with complex functional and communication limitations.
Introduction
Conventional full dentures are not simply a matter of setting up teeth in wax. It is actually necessary to follow a complex set of rules in order to understand which tooth belongs where and in what position. Those skilled in the field of full dentures must reidentified possess universal knowledge of the stomatognathic system. This is because all intraoral orientation points and jaw relationships are lost over time in edentulous patients, meaning that they must first be re-identified and correctly analyzed in relation to and in conjunction with the extraoral anatomy. In addition to theoretical knowledge, practical experience and experience with treatment are also necessary in order to create customized, patient-specific full dentures based on a collaboration between the patient, dentist and dental technician. Ultimately, this results in a solution that meets the esthetic and functional needs of all parties involved. Geriatric comorbidities and anatomical deficits made the following case particularly challenging.
Challenges while treating geriatric patients
Especially for elderly patients with multiple limitations – such as communication barriers due to deafness – every additional dental appointment represents an emotional, physical and organizational challenge. In these cases, conventional full dentures may still be the best option to avoid excessive surgery for a fixed restoration and multiple stressful treatment sessions. The basic prerequisite is that treatment is carried out with a sensitive touch, patience and the right communication. In cases of severe atrophy of the upper and lower jaw in older patients, the stability and retention of dentures can also pose a challenge. Below, Dentist
Dr. Sanja Štefančić (Marisadent, Zagreb, Croatia) and Dental Technician Samir Berisalić (Interdent, Celje, Slovenia) show how this type of full denture case was mastered with expertise, compassionate teamwork and individually layered VITA PHYSIODENS premium denture teeth.
Case study
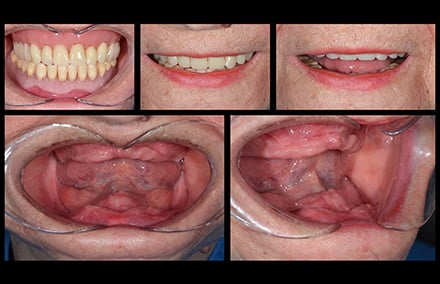
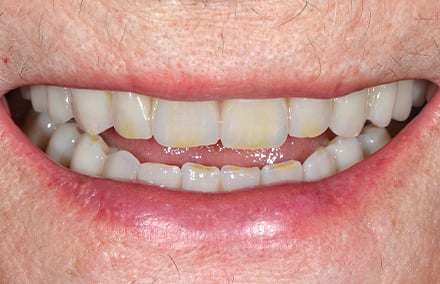
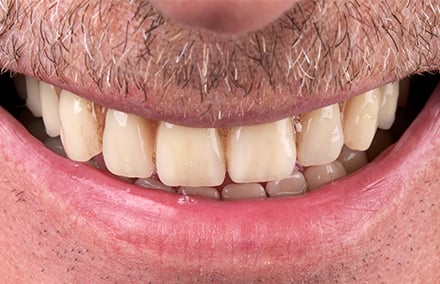
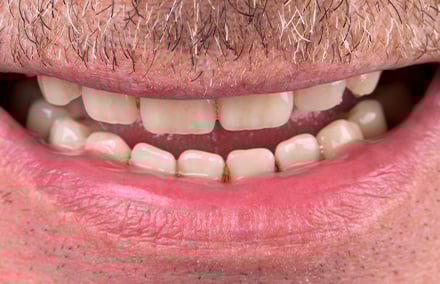
A 93-year-old patient who is deaf and has severely atrophied jaws came to the practice because she was dissatisfied with the esthetics and functionality of her current full dentures. She felt insecure due to the impaired hold and found the visual effect of the dentures too artificial. The denture teeth showed significant abrasion and almost no more occlusal relief, which reduced chewing abilities. Replacement was generally complicated due to the compromised jaw ridges and the lack of verbal communication. For this reason, and due to her advanced age, a fixed restoration requiring extensive surgery and time was ruled out. Instead, the decision was made to use the classic conventional method of denture fabrication, which was already familiar to the patient, with the aim of meeting her individual needs. From the outset, a special emphasis was placed on nonverbal communication, transparent treatment management and minimizing the number of treatment sessions.
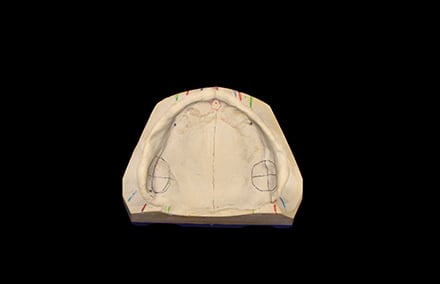
1. Initial situation with the old full dentures and severely atrophied alveolar ridges.
Communication and deafness
Due to the patient's complete deafness, communication was based on visual signals, slow and clear facial expressions, written notes and simple sketches. It was crucial to build trust through calm eye contact and show each individual step of the treatment beforehand. The practice team had to be trained in basic nonverbal communication techniques in order to reassure the patient and enable her to actively participate.
Pronounced atrophy
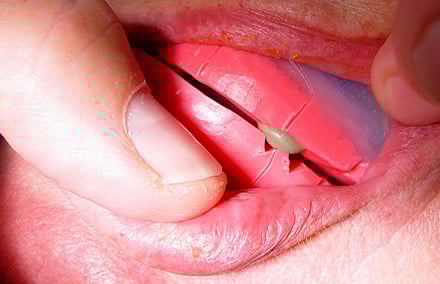
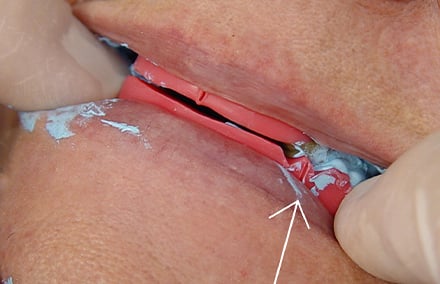
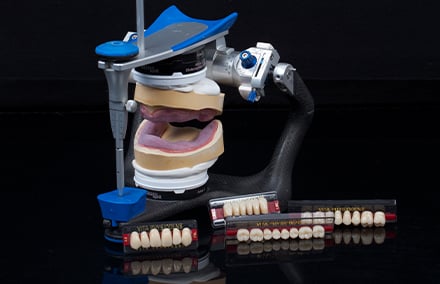
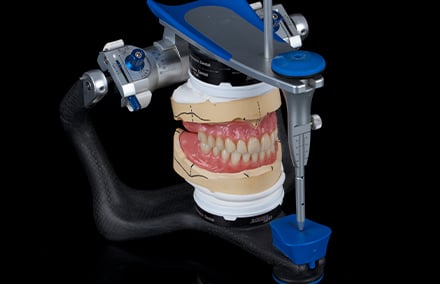
In the first step, two-phase anatomical impressions were taken using functional trays. The trays were customized and initially molded with a more rigid thermoplastic material (Bite Compound, GC Holding AG, Switzerland, Lucerne) specifically for the functional edges. The second impression was taken using the more fluid 3M Soft Monophase Polyether impression material (3M, Seefeld, Germany). The denture base was extended to the anatomically acceptable limits. Since this mucodynamic impression allowed the desired suction effect to be achieved as the basis for functional stability, there was no need to fabricate individual trays or perform a second impression session. In the laboratory, master models were produced on this basis and pre-articulated using the existing dentures in order to produce bite templates with wax ridges aligned to the patient's requirements.
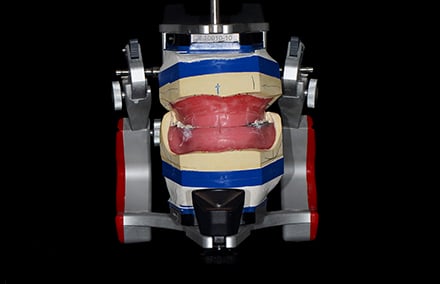
2. Mucodynamic impressions and transfer of the facebow to the articulator.
3. The heavily abraded old dentures and the bite registrations that were made on the master models.
Registration of the masticatory level
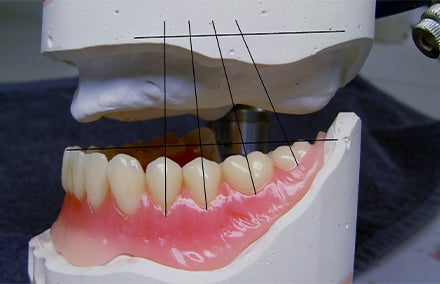
In the first step, the bite template was integrated into the upper jaw and the alignment of the wax rim was checked with the occlusion. This should be parallel to the bipupillary line and Camper's plane in order to allow the masticatory level to develop parallel to it. This ensures harmonious, anatomically correct positioning of the new full dentures. For three-dimensional transfer to the articulator, the aligned wax rim was registered with a facebow.
4. Comparison of the realignment of the wax rim along the bipupillary line and the old prostheses.
5. The occlusal plane was checked with the occlusionometer and registered with the facebow
Determination of maxillo-mandibular relationship
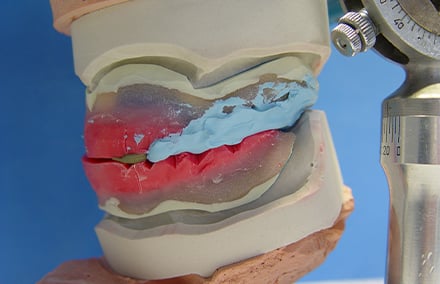
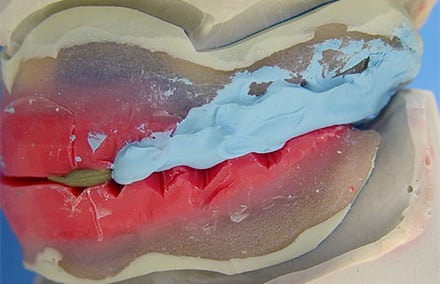
Subsequently, the centric jaw relationship was recorded in several steps. For this purpose, four circular recesses were incorporated into the posterior teeth area and a V-shaped groove was incorporated into region 23 to retain the key material in the upper jaw wax rim. First, an aluminum wax stop was applied exclusively at specific points in region 23, and the repositionability of the result was checked several times. This was followed by registration in the posterior region, also using aluminum wax, with repositionability being rechecked several times. The key was done with fine temporary cement. Finally, the midline and the position of the pupils were carved perpendicularly into the wax rim to mark the correct positioning of the central incisors and canines. The master models were articulated accordingly, and the model analysis was carried out using the markings.
6. The centric determination and key of the wax rims in the determination of jaw relations.
7. The registration of the jaw relationship was recorded multiple times with stops made of aluminum wax and temporary cement.
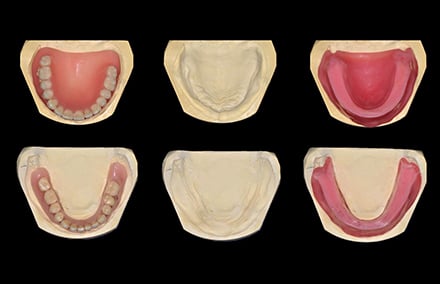
8. The lower jaw master model after model analysis.
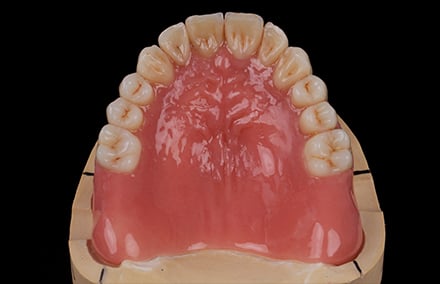
9. The upper jaw master model after model analysis.
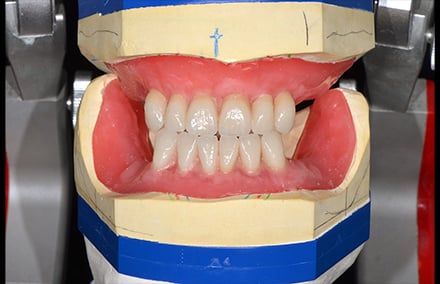
10. The master models were articulated according to the registered jaw relationship.
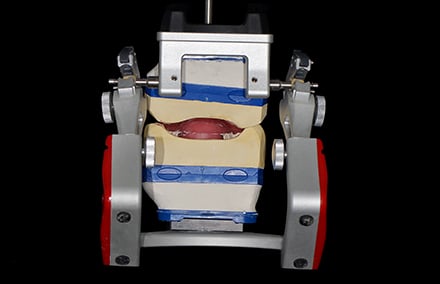
11. The space conditions in articulation in the lingual view.
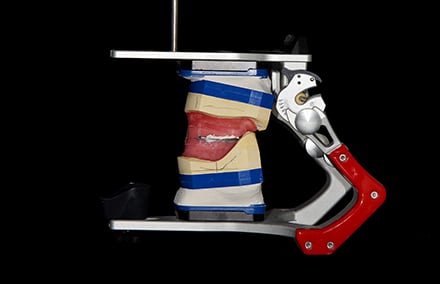
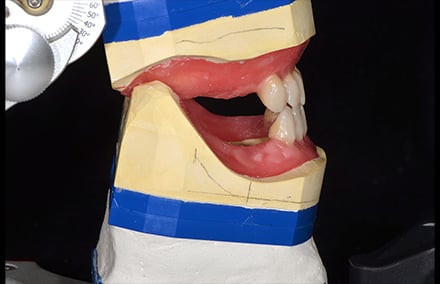
12. Articulated master models in lateral view in relation to the jaw.
Emulating nature
Dr. Eugen End observed and documented naturally healthy dentition early on in his studies as a dental student and in the course of his research, repeatedly discovered a similar distribution of contact points. The integrity of natural dentition led him to conclude that the physiological masticatory organ is naturally designed in such a way that the corresponding tooth morphologies are preserved in their basic form and are not destroyed. According to “BIO-Logical Prosthetics” (BLP), static contacts only occur in centric relation, the only physiological contact position. The final bite position in the physiological centric is the relaxed, loose, neuromuscular contact position of the lower jaw with the upper jaw, which can be repeatedly assumed by patients themselves from the resting position of the lower jaw, effortlessly and without external manipulation. Here, the lower jaw is brought with reproduceable, recurring precision into a central functional space of about one millimeter. The working cusps of the lower jaw are guided against the working cusps of the upper jaw. All other tooth-guided movements of the lower jaw are unphysiological according to BLP. The similarities in occlusal tooth morphology quickly led to the desire to manufacture prosthetic teeth based on natural models. At that time, prosthetic teeth were only available without any imitation of the natural model. Models based on biological blueprints led to the first prototypes, which later developed into the fully anatomical VITA PHYSIODENS teeth, introduced in 1995 and used in the following.1
BIO-Logical tooth selection
Selecting the right upper anterior teeth for the existing vertical and horizontal space, matching the shape of the head and the patient's preferences in terms of shape and shade, is a crucial step in ensuring patient acceptance. In this case, the decision was made in favor of VITA PHYSIODENS, which offers a wide selection with 21 shapes in 28 VITA SYSTEM 3D-MASTER and 16 VITA classical A1-D4 shades. The prosthetic tooth is layered three-dimensionally by hand using enamel, dentin and neck material. Each tooth is therefore truly unique, ensuring a natural and individual effect of the full denture restoration. The highly cross-linked VITA MRP (Microfiller Reinforced Polymer Matrix) composite formulation also promises maximum abrasion resistance in clinical use.2 In this case, the decision was made to use the triangular VITA PHYSIODENS Anterior T1S in shade D2. The narrower VITA PHYSIODENS Anterior L2M was used in the lower anterior region. Based on the space analysis, VITA PHYSIODENS Posterior 21E was selected for the posterior region.
Alignment in the anterior region
For the anterior tooth alignment in the upper jaw, a silicone key with center line and canine markings was made in the lower jaw so that the vertical and horizontal dimensions could be checked at any time. Since VITA PHYSIODENS Anterior is based on the morphology of natural, healthy dentition, placement in the upper jaw was intuitive. The front teeth in the lower jaw were positioned with their incisal edges parallel to the cutting edges of the upper front teeth. Since the upper wax rim had already been aligned parallel to the bipupillary line, the front teeth were now automatically parallel to it as well. Slight abrasions were created on the cutting edges of the front teeth of the lower jaw using rotary instruments.
13. A silicone key was produced to provide guidance while setting up the esthetic zone.
14. For the setup, the wax rim in the upper jaw was reduced as appropriate for the situation.
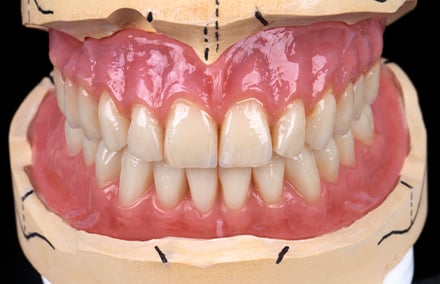
15. The esthetic zone created with the triangular VITA PHYSIODENS T1S in the shade D2.
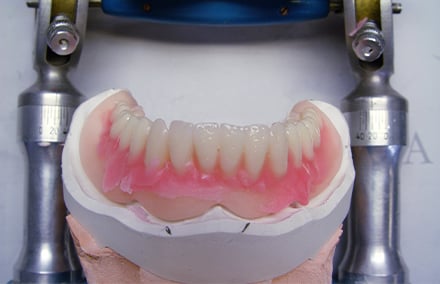
16. The situation in the lower jaw before wax-up.
17. The setup in the lower jaw was implemented in a somewhat playful manner to achieve individualized results.
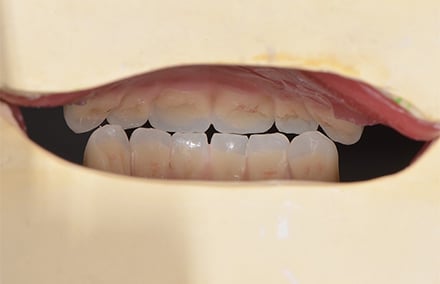
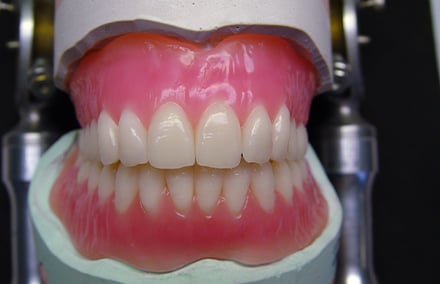
18. The front teeth looked completely natural with the customized VITA PHYSIODENS.
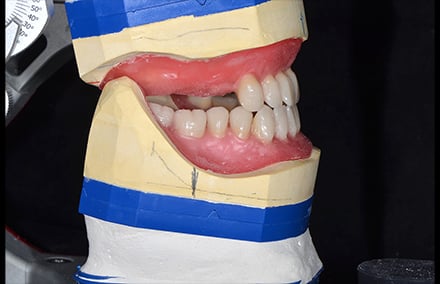
19. The interincisal alignment in the lateral view.
20. The wax setup of the front teeth in the lingual view.
Placement in the posterior region
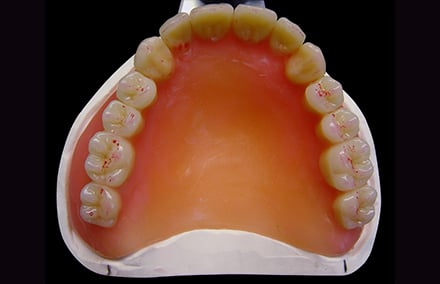
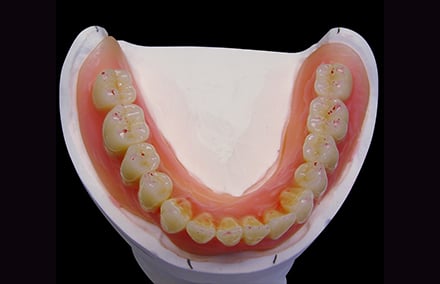
When the posterior teeth were positioned in the lower jaw, care was taken to ensure that only the front teeth in the lower jaw and the disto-buccal cusps of the second molars touched the occlusal plane. The occlusion plane must in turn be parallel to Camper's plane and parallel to the bipupillary line. The finished setup in the lower jaw was checked with the occlusal plane indicator, and only then were the posterior teeth in the upper jaw set up. The upper posterior teeth were brought into contact with the lower jaw position according to BLP in such a way that approximately 10 contact points were created per quadrant. Contacts on the inner inclinations of the working cusps were prioritized. It is typical for physiological occlusion that the premolars have one or two contacts, the molars have four or five contacts, and the second molars have two to three contacts. Only a few contacts were made on the non-supporting cusps and marginal ridges. The lower posterior teeth were tilted lingually, the upper ones buccally. This meant that valuable working contacts were quickly established and only minor adjustments were needed to optimize the process. The wax sample was successful, so the design was implemented in plastic.
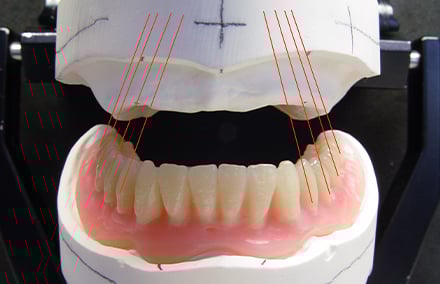
21. Checking the canine tip and fissure line with a stretched rubber band.
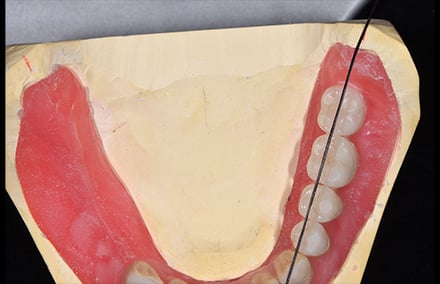
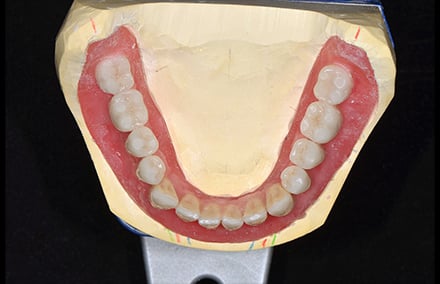
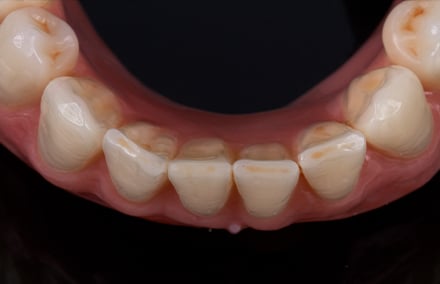
22. The completed alignment of the lower jaw in the occlusal view.
23. The limited space in the first quadrant before setup.
Characterization with stains
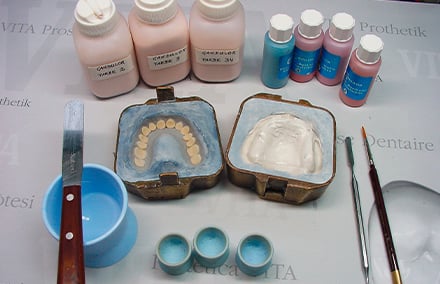
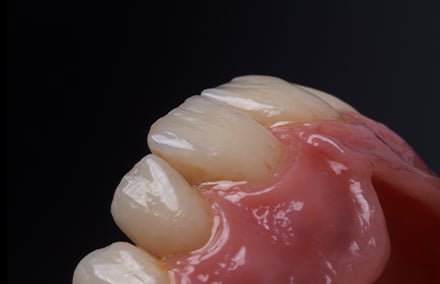
After implementation in plastic, the base was developed. At the patient's request, the teeth were characterized in a manner appropriate to her age using the light-curing composite stains VITA AKZENT LC EFFECT STAINS cream, khaki, blue, gray-blue and purple for the cervical, interdental and central incisors in the upper jaw. The mucogingival anatomy was created on the labial shield using VITA AKZENT LC EFFECT STAINS purple, pink, dark red, orange and cream. Finally, the characterized areas were sealed with VITA AKZENT LC GLAZE, establishing a uniform degree of gloss.
Integration and conclusion
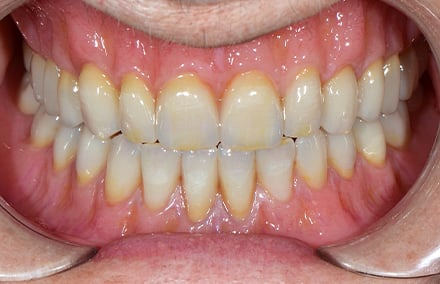
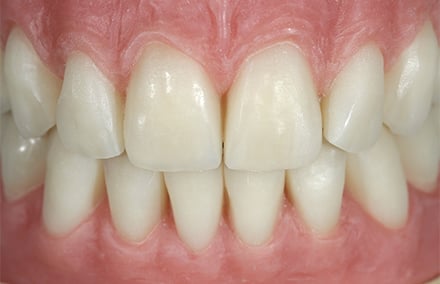
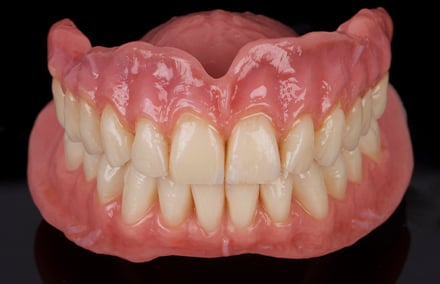
After a short period of time, a pronounced suction effect became apparent in the upper and lower jaws during integration, ensuring that the dentures were securely positioned. Since the mucodynamic impressions had been taken using customized functional trays, the treatment could be reduced by one session without compromising the retention of the restorations. This in turn, provided the time needed to guide the patient through the remaining treatment sessions with sensitivity and appropriate communication. The manually and anatomically layered VITA PHYSIODENS basically ensured that the desired individuality and naturalness was achieved. The characterizations with composite stains not only made it possible to reproduce a suitable gingival anatomy, but also to design the teeth for the 93-year-old patient in a manner appropriate for her age. The patient was visibly pleased with her new smile and was also completely satisfied with the functionality and her new appearance during the follow-up appointments. The case shows that full denture restoration is still the right choice in many geriatric cases.
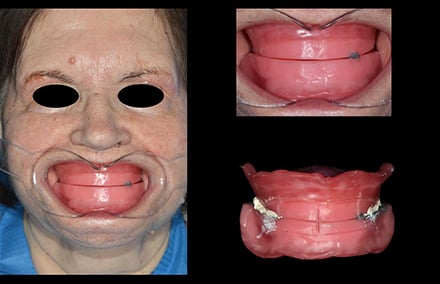
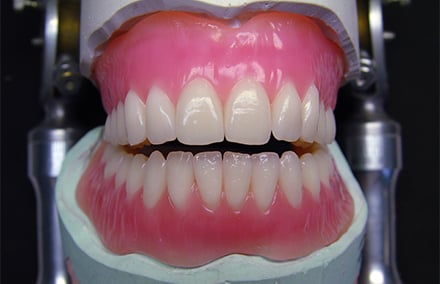
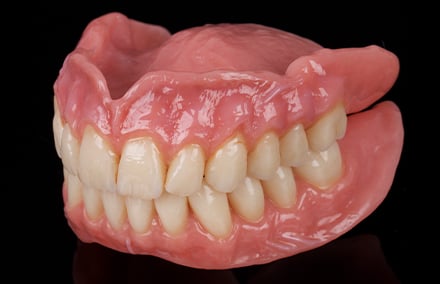
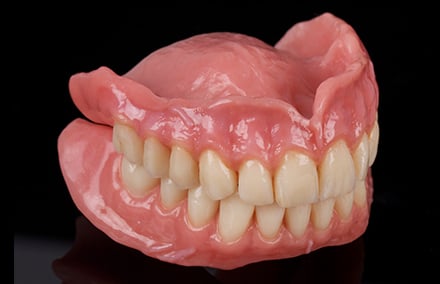
24. The age-appropriate appearance of the full denture restoration during clinical integration.
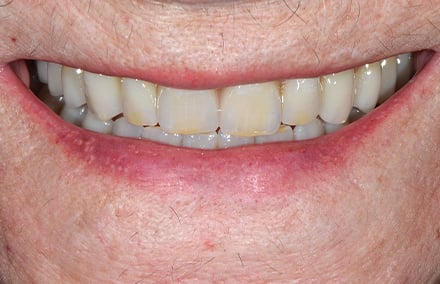
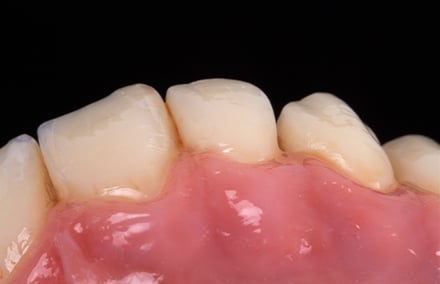
25. The course of the incisal edge harmonized with the curve of the lower lip.
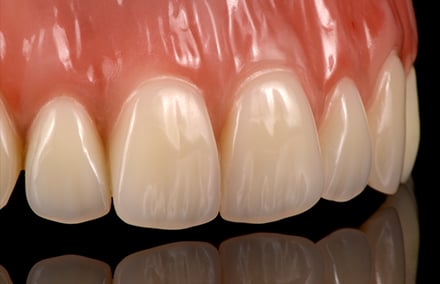
26. The new smile with VITA PHYSIODENS looked absolutely natural.
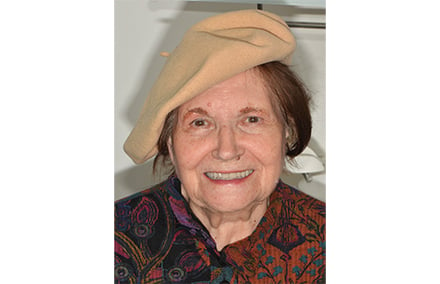
27. The delighted elderly patient.
1Die physiologische Okklusion des menschlichen Gebisses, Dr. Eugen End, Verlag Neuer Merkur, 2005/DVD „BIO-Logical Prosthetics“, Dr. Eugen End, VITA Zahnfabrik, 2009.
2 Pin-on-block (POB) wear test at the Poliklinik für Zahnärztliche Prothetik of the University of Regensburg; Report Number: 280_2/Project Number: 280. 2015-11-09.
Implant prosthetics according to the Bio-Logical Concept (BLP)
"Shape, shade and position of the anterior teeth are all critical for a successful restoration. For an esthetic restoration with a natural play of shade and light, the VITA PHYSIODENS tooth line was selected, which is consistent with the principle of Bio-Logical prosthetics"
Viktor Fürgut, Dental Technician, Ravensburg, Germany
Even with consistent implementation, conventional occlusion concepts often fail in practice because these prosthetic strategies are still largely based on purely mechanical parameters. The intellectual and technical knowledge of previous generations is still often used as the theoretical basis for the seemingly evidence-based concepts that are clinically implemented. However, the occlusion concept of nature in physiological dentition, optimized over thousands of years in evolution, follows a very different blueprint. This is why Bio-Logical Prosthetics (BLP) has become established as a physiological occlusion concept in all prosthetic disciplines, as it consistently follows the characteristics of a natural occlusion.
Neuromuscular mandibular alignment
The implant prosthesis wearer also shows the same stereotypic chewing movements as every person with full dentition. He also needs no bilateral balancing, no unilateral balancing and no canine alignment, but his lower jaw is also neuromuscularly guided by the central nervous system, cortically conscious or subcortically unconscious. For a harmonious integration of an implant prosthesis in the stomatognathic system, he therefore needs denture replacement teeth in the same form and position in his jaw where he once had his natural teeth. And these original teeth certainly had no maximum tripodized contacts, no consistent ABC contacts, no lingualized occlusion and no long centric.
Centric functional space
As long as there is solid food between the teeth, it is simply not possible to have a tooth alignment. Only when the food is chewed into a bolus can contact occur. However, this contact only takes place in a three-dimensional functional space of about 1 mm, which features physiological chewing curves. Implant-supported prostheses should also be balanced in this centric functional space. This only works if the new teeth match the shape, size and placement of the original teeth. The Spee and Wilson curves, as well as the helicoid twist curve, are not compensation curves for the balancing of prostheses. This anatomical structure has been evolutionarily optimized in its function in order to work economically with the least amount of force. The tooth axes in the upper and lower jaws are in line with the force vectors of the closing masticatory muscles. The concept of the physiological occlusion is logical. It makes clear statements on the position of the lower to upper jaw in anterior-posterior, lateral and vertical position and on the movement patterns. The occlusal relief of the posterior teeth and the anatomical shape of the anterior teeth follow this function and the centric positional relationship in their shape.
Concept with long-term experience
Because of its reproducibility, the Bio-Logical concept, which copies the pattern of nature, can be universally implemented in combination therapies prosthetically, conservatively and orthodontically. It is not an artificially induced theory, but rather a documented deduction from observation and consideration of natural conditions. In 20 years of practice, the concept of nature has proven to be very successful in all prosthetic disciplines. The positive reactions of patients to the esthetics and chewing comfort speak for themselves. All integrated prostheses, whether implant-supported or not, all combination work in various designs, were produced by me without balancing, without canine alignment, without anterior tooth alignment and without group alignment. Not a single patient has missed these unphysiological tooth tracking movements in his new restoration.
Bio-Logical implant prosthetics
More and more full dentures are integrated today as implant-supported. A huge step towards greater quality of life for edentulous patients. Many superstructures are possible, but the most appropriate solution must be individually tailored to the patient. Age and motor skills are the essential criteria for providing the patient with problem-free handling of his dentures in the long term. No variants of implant-supported restorations, however, allow us to abandon the basic rules of total prosthetics in physiological occlusion. The neuromuscular system with all its involved structures, requires a biological rather than a mechanical-static way of thinking. And don't patients have a right to be cared for according to the laws of nature? Are static, mathematical/geometric concepts really the better choice? Then the question arises: Should the dentures be anterior tooth-aligned or canine-aligned, or both, and when should the alignment take place? Is it better to set things up bilaterally balanced or unilaterally balanced? Should posterior teeth with reduced chewing surface be used? Large or rather small teeth? We could continue on and on with the list of confusing issues. None of this helps the dentist, the dental technician and especially the patient.
The procedure
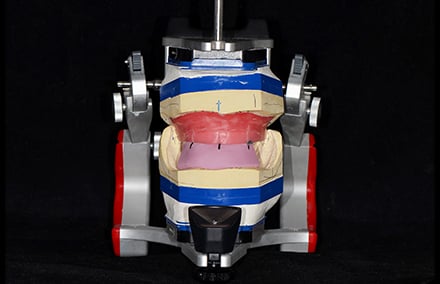
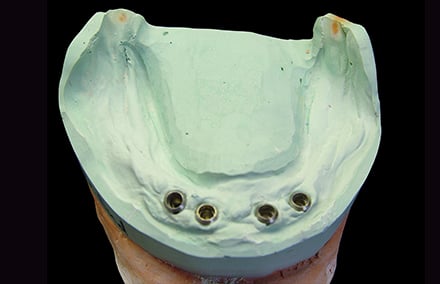
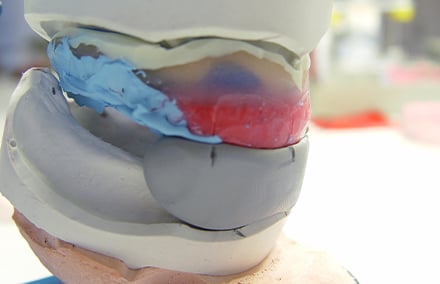
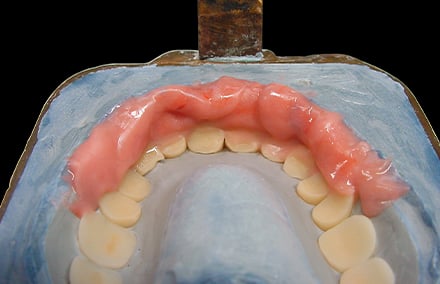
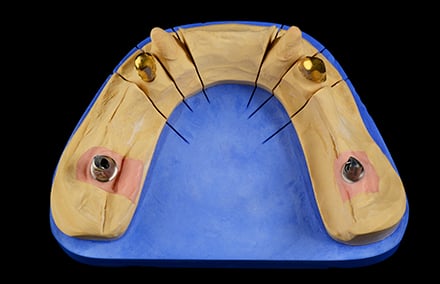
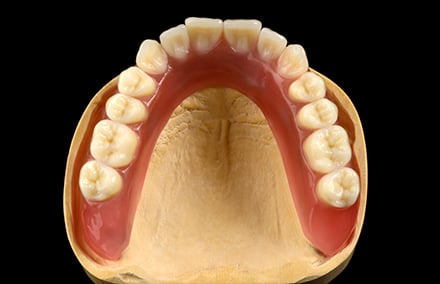
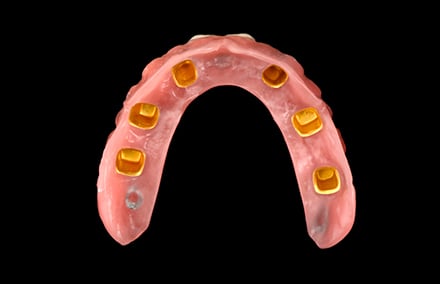
In the following case, a patient is treated with a full denture in the upper jaw (Fig. 1) and with an implant-supported removable piece in the lower jaw, in accordance with the Bio-Logical principle. For the stable anchoring of the lower jaw prosthesis, four implants were inserted in regions 32, 33, 42, and 43 (Fig. 2). Appearance, esthetics and speech, along with phonetics, are of the utmost importance for most patients, along with the chewing function. The dental technician usually has no contact with the patient, so it is very important that the practitioner gives the dental technician accurate information regarding tooth position. The information must be three-dimensional. The incisal length of the anterior teeth, the labial/oral position and the information on parallelism to the bipupillary plane of the entire upper jaw front must be determined. The facial center, smile line and canine line are also essential landmarks for the dental technician. The practitioner transfers the three-dimensional information via the wax rim on a bite template, or better still, on the tray of the precisely fitting functional impression. The upper jaw wax rim is heated in warm water and can then be moved in the labial or oral direction until the lip profile is right. Now the speech and phonetics can also be inspected.
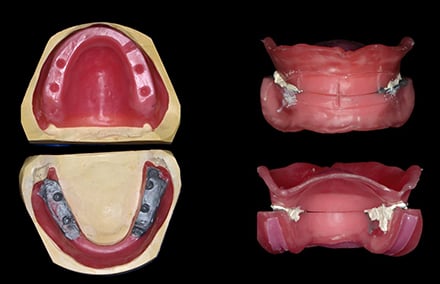
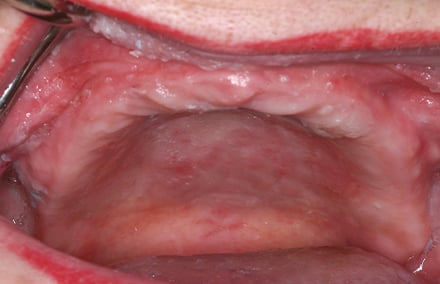
1. The edentulous upper jaw.
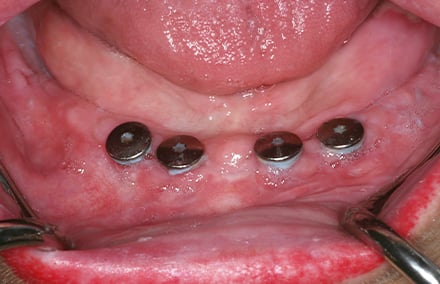
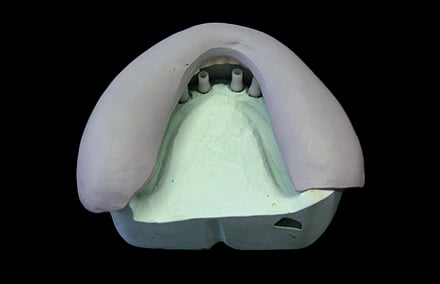
2. Edentulous lower jaw with 4 implants.
Registration of the centric
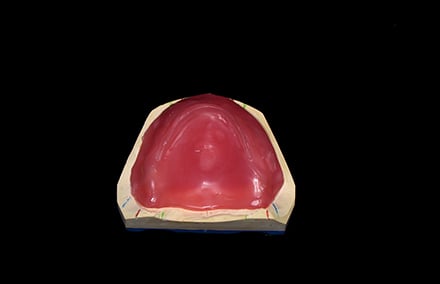
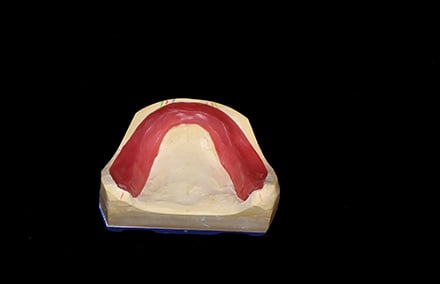
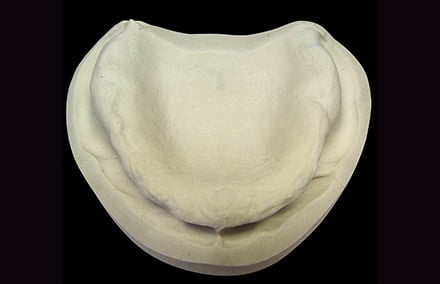
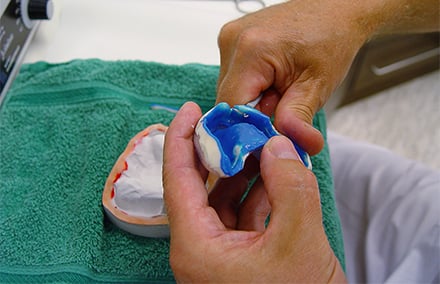
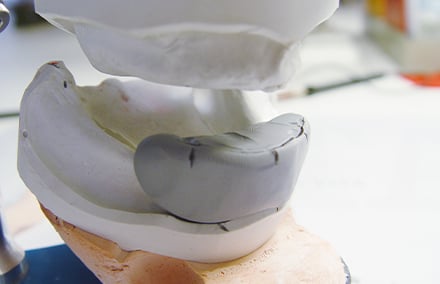
A perfect impression and precise model fabrication of the jaws (Figs. 3 and 4) as well as an optimal bite registration are the basic conditions for a well functioning denture. It is also recommended that the centric be registered with wax rims on the individual trays in the case of edentulous jaws. After functional impression and master model fabrication, extended edges of the impression should be shortened to obtain perfectly fitting bite templates (Figs. 5 and 6). This method guarantees a very precise transfer from the mouth to the master model or vice versa.
3. Precise model of the lower jaw.
4. Precise model of the upper jaw.
5. Reducing the edges.
5. Custom-fit lower jaw template.
The centric must be repeatedly confirmed by the patient neuromuscularly, without external manipulation of the practitioner, from the resting position. Figure 7 shows a small aluwax stop dripped onto the upper jaw and a tip formed from the wax rim in the lower jaw. After the patient confirms the impression in the aluwax stop as often as he wishes (the wax rims do not touch one another circularly), the rims are encoded (here with zinc oxide/eugenol). The practitioner has control over the encoding. The wax tip in the lower jaw must again be in the impression of the aluwax stop (Fig. 8). The impression trays, encoded and precisely placed in this manner, allow a realistic articulation of the models (Figs. 9 and 10).
7. Confirmation of the centric.
8. Controlled encoding.
9. Registration during articulation …
10. … custom-fit on the master models.
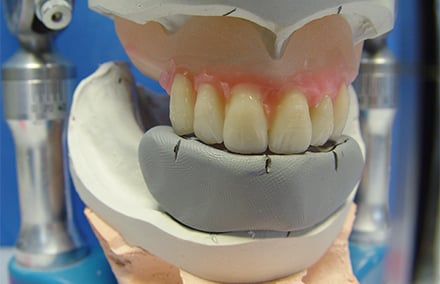
The tooth setup
The teeth are now set up, regardless of the implants in the lower jaw. The superstructure on the implants is only produced after the wax try-in is successful in every aspect. The selection of anterior teeth is a very important work step in which the patient should be included. Shape, shade and position of the anterior teeth are all critical for a successful restoration. For an esthetic restoration with a natural play of shade and light, the VITA PHYSIODENS tooth line (VITA Zahnfabrik, Bad Säckingen, Germany) was selected, which is consistent with the principle of Bio-Logical prosthetics. The individual curve of the incisal edge, the natural surface design, and the volume of the VITA PHYSIODENS Anterior Teeth, ensure optimal naturalness with good gingival modeling. In the posterior tooth area, the fully anatomical VITA PHYSIODENS posterior teeth were also used. It makes no difference whether the restoration is mucosa-supported or implant-supported. It is important to optimize and reduce chewing forces. This is best achieved with VITA PHYSIODENS posterior teeth, which can be set up according to the laws of natural dentition in the centric. This physiological occlusion reduces chewing forces to a minimum. The prerequisite for this is the biological morphology of the chewing surfaces, which results in an optimal distribution of contact points, as in the natural dentition.
Principles from the textbook of nature
When observing naturally healthy dentition, a recurrent occlusal contact point distribution was found. Bio-Logical prosthetics with VITA PHYSIODENS are based on this natural specification. These laws are also heeded in the preparation in this clinical case. The patient is given a comfortable, physiological chewing function, which is guided neuromuscularly and not dentally:
Consistent and simultaneous point contacts in the posterior tooth area in a typical distribution with individual variation width. The premolars have 1-3 contacts, the first molar 3-5 contacts, and the second molar 2-3 contacts.
On average, we find 20 contact points per jaw in the posterior tooth area, with 10 in one quadrant, and a range of 6 to 14 points.
The contact points are located in the upper jaw, mainly on the inner slopes of the palatal cusps, and in the lower jaw on the inner slopes of the buccal cusps at different heights.
In the lower jaw, there are only a few edge bead contacts, in the upper jaw mainly on the premolars.
There are fewer contacts on the inner slopes of the non-working cusps.
All or only some of the anterior teeth may have contact – simultaneously and consistently with the posterior teeth. The contact in the front is more of a light contact.
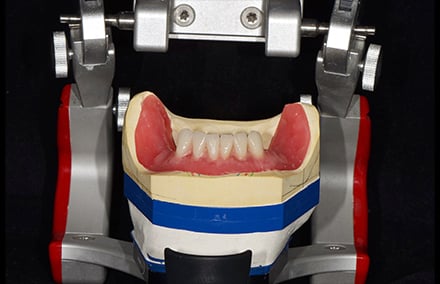
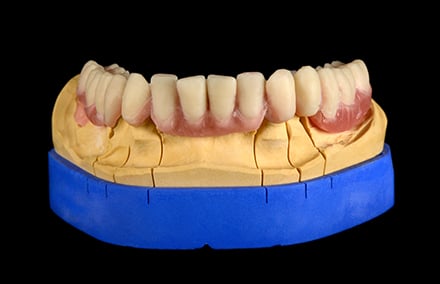
11. - 13. The secure, three-dimensional setup of the anterior teeth in the upper jaw.
14. - 15. Setup of the anterior and posterior teeth.
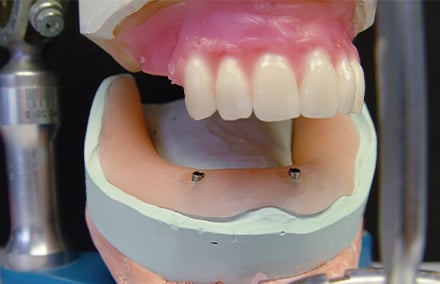
Figures 11 to 13 show the secure, three-dimensional positioning of the upper jaw anterior teeth thanks to the lower jaw key made of silicone. The wax rim formed on the patient and the anterior tooth alignment match. The anterior and posterior teeth of the lower jaw are then placed on a resin base, with fixations on at least two model analogues (Figs. 14 and 15). When setting up the lower jaw front, an incisal parallelism to the incisal edges of the upper anterior teeth should result (Fig. 16). When the articulator is closed, an overbite of 2 to 4 mm should be achieved (Fig. 17). Anterior tooth contact should be avoided in order to allow the practitioner to finish grinding in during insertion, without having to grind the anterior teeth.
16. Upper and lower jaws are incisally parallel.
17. Overbite of 2-4 mm.
The posterior tooth setup
When setting up the posterior teeth, make sure that the teeth are aligned with the axis of the tooth in the direction of the closing musculature (Fig. 18). The occlusal plane should be parallel to Camper's line. The height of the occlusal plane results from the position of the lower incisors, which, like the disto-buccal cusp of the second molar, are at the level of the retromolar trigone (Fig. 19).
18. Tooth axes in the direction of the …
19. … closing musculature.
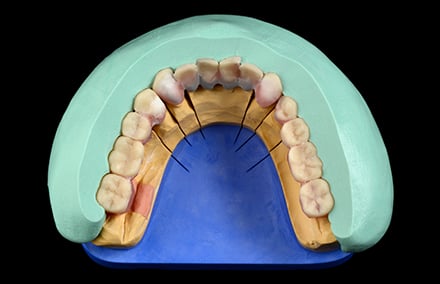
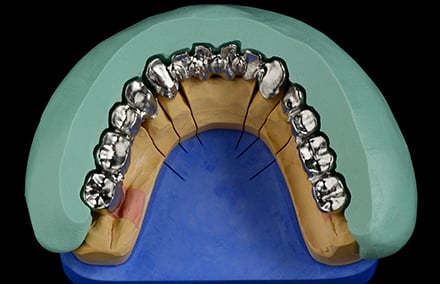
It is not only the position of the posterior teeth that is crucial for an optimal chewing function. The distribution of the contact points, as in the natural physiological dentition, is essential for reducing chewing forces to a minimum. The VITA PHYSIODENS Posteriors, specially developed and modeled by Dr. med. Eugen End for the concept of nature, has all the prerequisites for easily achieving this goal (Figures 20 and 21).
20. Physiological maxillary contacts.
21. Contacts as in the natural bite.
The implementation
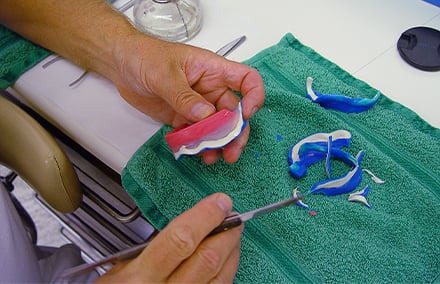
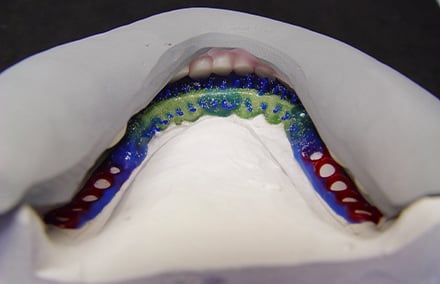
The upper jaw prosthesis is pressed in the press cuvette with differently colored resins, and the gums are reproduced as naturally as possible (Figs. 22 to 24).
22. Variously colored resins.
23. Labially inserted gingiva.
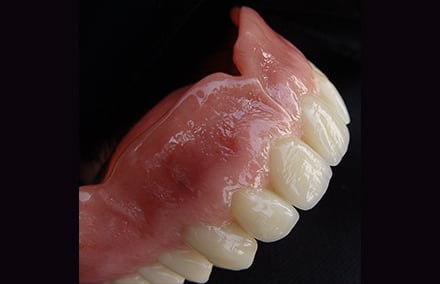
24. Finished, polished prosthesis.
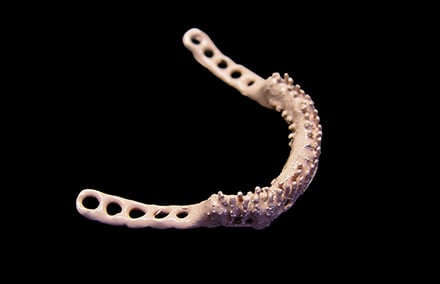
The lower jaw is completed after the fabrication of the individual bar (Figs. 25 to 27), and the model casting (Figs. 28 to 30) using the index method. In order to make the prosthesis as "invisible" as possible, colored resins are used. Figures 31 and 32 show the finished lower jaw prosthesis with the incorporated model casting of basal with interchangeable attachments.
25. Fabrication of the bar …
26. … on four implants.
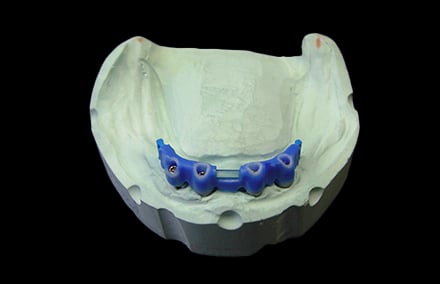
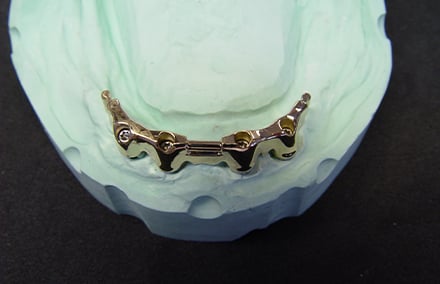
27. The finished bar.
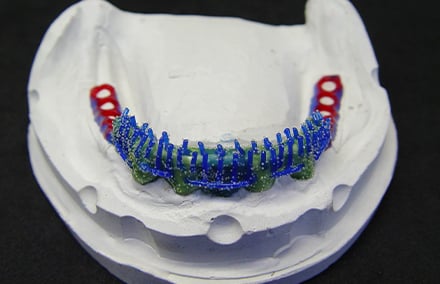
28. Model casting in wax.
29. Retention pins.
30. Model casting made opaque.
31. Bar with all parts.
32. Natural white/red esthetic.
The practitioner must decide which superstructures are to be used, individually with the patient. Factors such as the age of the patient, the ease of cleaning the implant abutments and the dentures, as well as the patient's motor skills and financial resources should be taken into account. The dental technician is required to use the highest quality materials available today in his practice. Figures 33 and 34 show the successful prosthetic on the implants.
33. The individual tooth setup.
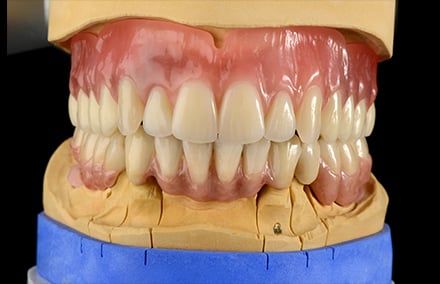
34. Final restoration in the upper and lower jaws
Implant-supported dentures are forward-looking and comfortable, whether fixed or removable. Dental technology must be prepared for this. A beautiful challenge.
Naturally beautiful! Prefabricated meets individuality - Modern prefabricated teeth as the perfect counterpart to natural teeth
"With their physical shape, VITA PHYSIODENS teeth appear strong and expressive. Distinctive interdental ridges, convex labial surfaces, natural curvature features and characteristic surface morphology are reminiscent of masterfully modeled teeth. In terms of their light-optical properties, VITA PHYSIODENS denture teeth are also in no way inferior to the ceramic veneers in the lower jaw."
Björn Czappa, Master Dental Technician, Oldenburg, Germany
In the following case study, the focus was on meeting the patient's high functional and esthetic demands. The edentulous upper jaw was treated with a removable restoration. Fixed bridges achieved the desired results in the sparsely dentated lower jaw. Using natural-looking prefabricated teeth, it was possible to create a counterpart to the ceramic veneers in the lower jaw (VITA VM 13) that matched in shade and shape. In the final result, there is no noticeable esthetic difference between the various materials.
In modern dental technology, craftsmanship and individual artistry unite with prefabricated components. Standard solutions rarely produce the desired results, especially with discerning patients. Individuality is crucial! The combination of prefabricated restoration elements and individual refinement allows efficient work with virtually no compromises.
The distinctive solution
We dental technicians have always invested a great deal of time, effort and patience in ceramic layering. Prefabricated teeth, on the other hand, were often neglected in the past. This contradicts modern denture concepts, where the esthetics of removable restorations are highly valued. VITA PHYSIODENS premium teeth are an essential component of the complex restoration in the patient case shown. The distinctive shape, color and material concept of the polychromatic teeth allows for individual restorations with characteristic features, despite being "prefabricated". Due to their physical form and natural tooth characteristics, the teeth have become a perfect addition to our working concept.
Dental case analysis and planning
The 61-year-old patient consulted the dental practice with the desire for a new denture restoration. The businesswoman works in the public eye and has high standards for her appearance. The previous dentures did not meet her esthetic expectations and were not in keeping with her extremely well-groomed appearance. For increased comfort and greater security, the patient opted for a palate-free, implant-supported restoration of the edentulous upper jaw. The lower jaw needed to be completely fixed to ensure optimal stability of the dentures.
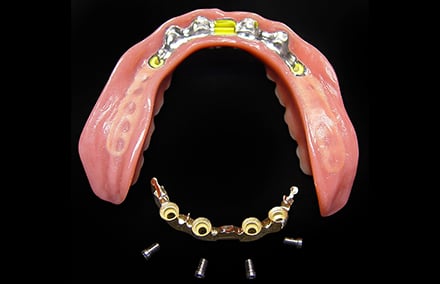
Upper jaw: Double crown concept Six implants were inserted into the edentulous upper jaw to support the double crown dentures (Weigl protocol). Custom titanium abutments were intended to function as primary components, and together with electroformed secondary components, ensure a secure fit. The advantages of these types of dentures are that they are removable, easy to keep clean and fit without any tightness. From a static point of view, the implants were ideally distributed in the jaw in the case shown. The quadrangular support provided by six implants offered ample support, thanks to their polygonal structure.
Lower jaw: dual structure bridge In the lower jaw, only 33 and 34, as well as 43 and 44 were available as abutment teeth. The incisors were missing, and there was a free end on both sides after 34 and 44, respectively. For the denture restoration, a tooth-supported bridge in the anterior region (43 to 33) and two dual structure bridges (Greifswald concept) in the posterior region were planned. Dual structure bridges are conditionally removable restorations that connect at least one tooth (34 or 44) and one implant. Implant-supported single crowns are an alternative to dual structure bridges. We consider the reduced number of implants and high wearing comfort to be advantages of the dual structure bridge. With a purely implant-supported restoration, tactile sensitivity is extremely low. Periodontal and pulp receptors are absent. By incorporating periodontally healthy and vital teeth, physiological tactile sensitivity is preserved. Teeth 33, 34, 43 and 44 were prepared to receive the three bridge restorations. For strategic abutment augmentation in the area of free-end gaps, the dentist inserted one implant each in regions 47 and 37.
Creating a framework
A setup was created as the basis for the restorations and fixed in place using a silicone key. This served as a template for all further work steps.
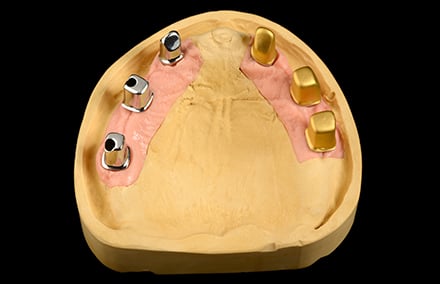
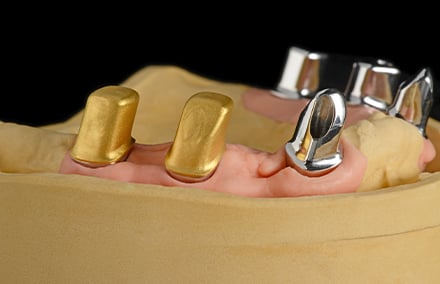
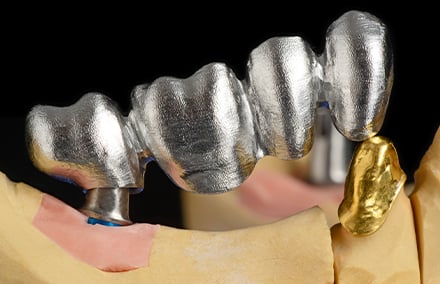
Custom abutments, double crowns and electroplated caps We used the laboratory scanner to digitalize models and setups and designed the abutments in CAD software. In the concept presented, the implant abutments in the upper jaw also function as primary parts. They were designed with a conicity of two degrees and manufactured from titanium using a 5-axis milling machine (Datron D5). To ensure that double crowns function well in the long term, the secondary part must fit the primary part perfectly. We used the table milling machine to give the milled primary crowns a highly smooth surface. Note: Even the slightest unevenness can jeopardize the long-term success of the restoration! The electroplated fine gold could now be electroplated directly onto the smooth surface of the primary parts (Fig. 1). The function of a double electroplated crown is achieved through adhesion. We consider the tribological behavior of the titanium primary parts and the electroplated caps to be representative examples (see Fig. 2).
For the implants in the lower jaw, we fabricated two conical abutments and produced electroformed caps for teeth 44 and 34. The concept behind Greifswald dual structure bridges is that the natural abutment tooth must be protected from the risk of secondary caries by means of a firmly cemented electroplated cap. We carefully rubberized the 0.2 mm thin electroplated caps and created a basis for the semi-permanent cementation of the bridge (Fig. 3).
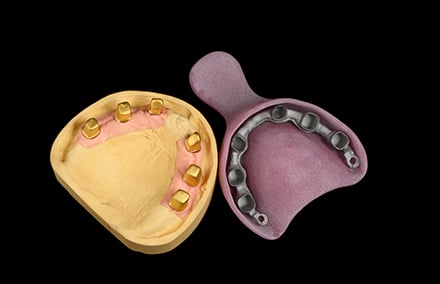
1. Upper jaw implant model with titanium abutments (= primary components) and electroplated caps (= secondary components).
2. The highly smooth surface of the primary components is a prerequisite for long-lasting functionality.
3. Lower jaw model with prepared abutment teeth, electroplated caps and titanium abutments.
Tertiary structure and bridge substructure Based on the digitalized setup, the three bridge substructures for the lower jaw were manufactured in a reduced crown form using CAD/CAM technology from a non-precious metal alloy (Figs. 4 to 6).
1. Dual structure bridge: Implant region 47 (abutment) on tooth 44 (galvanic cap) 2. Dual structure bridge: Implant region 37 (abutment) on tooth 34 (galvanic cap) (Fig. 7) 3. Tooth-supported bridge: from tooth 33 to tooth 43
For the upper jaw, we fabricated a cast tertiary structure from a non-precious metal alloy (Quattro Steel Soft, Goldquadrat). To give the substructure a loose and tension-free fit, the electroplated caps were first coated with an interspace varnish (100 to 150 μm). The following components were provided to the practice for intraoral bonding (Fig. 8):
After integrating the abutments into the mouth, the dentist bonded the electroplated caps to the tertiary framework in accordance with the Weigl protocol (intraoral fitting). The framework was then removed from the mouth and the excess adhesive was removed. This intraoral fit was communicated to us via a fixation impression with an inserted framework. With the certainty of a precise scaffold fit for the patient, we were now able to focus all our attention on the finishing esthetic touches.
4. The setup for the lower jaw reflects the desired goal.
5. The setup was secured using a silicone wall...
6. ... based on this, the frameworks were fabricated in a reduced crown shape.
7. Close-up view of the framework for the dual structure bridge.
8. These components were delivered to the dental practice: primary and secondary crowns, tertiary structure and custom tray.
Individual esthetic implementation
Ceramic veneering The bridge frameworks in the lower jaw were veneered with ceramic. For this purpose, we prefer the fine-structure feldspar ceramic VITA VM 13 (VITA Zahnfabrik). We were able to achieve even and natural-looking layering with this material relatively quickly (Fig. 9). For the denture gingiva, we used different colored gingiva materials (Gingiva Kit, VITA Zahnfabrik). The veneered bridges exhibited a wonderful, vibrant interplay of colors that radiated naturalness from within (Fig. 10). The delicate texture and homogeneity of the ceramic allow the light to refract and reflect on the surface – just like natural tooth enamel.
9. Close-up view of a ceramic-veneered dual structure bridge.
10. Ceramic-veneered anterior bridge. The delicate texture and homogeneity of the ceramic allow the light to refract and reflect on the surface.
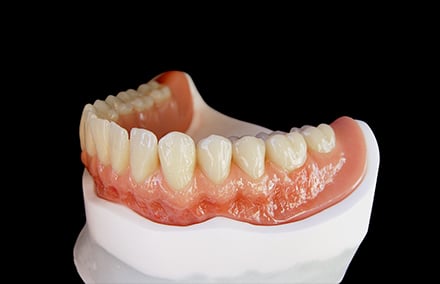
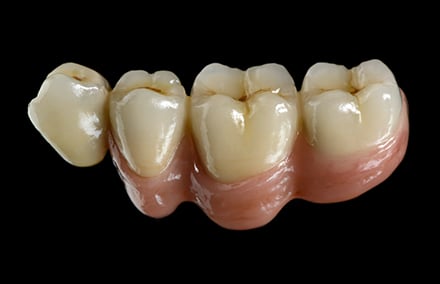
Prefabricated teeth and veneering of the gingival areas To achieve a uniform appearance, the natural look of the ceramic veneers in the lower jaw had to be transferred to the dentures in the upper jaw. In this case, the prefabricated VITA PHYSIODENS teeth were a key component in achieving a harmonious end result. Due to the material structure (MRP, microfiller reinforced polyacrylic), the teeth not only provide high chewing comfort, but also exceptional abrasion resistance. The dentures for the upper jaw include 21 different front tooth shapes. The appropriate teeth were selected and positioned with the help of the mould chart. After conditioning the framework, we finished the prosthesis in plastic.
With their physical shape, VITA PHYSIODENS teeth appear strong and expressive (Fig. 11). Distinctive interdental ridges, convex labial surfaces, natural curvature features and characteristic surface morphology are reminiscent of masterfully modeled teeth. In terms of their light-optical properties, VITA PHYSIODENS denture teeth are also in no way inferior to the ceramic veneers in the lower jaw. They exhibit a smooth shade gradient from cervical to incisal. In this case, VITA PHYSIODENS was once again able to harmonize perfectly with the nuanced color play of the ceramic veneers.
11. The prefabricated VITA PHYSIODENS teeth harmonize with the ceramic veneer.
12. The double crown dentures from the occlusal side. The palate-free design further increases the comfort.
13. View from the basal region. The secondary components were bonded intraorally to the substructure prior to finishing.
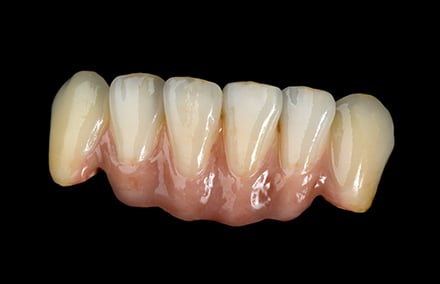
14. The premium teeth in the upper jaw are the perfect counterpart to the individual ceramic veneers in the lower jaw.
We paid close attention to the denture gingiva. A removable denture doesn't necessarily have to look like "plastic dentures. Modern plastic veneering materials make it possible to achieve an individual and natural-looking appearance. We designed an interplay of concave and convex surfaces, imitating the alveolar processes and papilla structures. A polychromatic gum structure was used to enhance the esthetic results. During the polishing process, the natural profile of the PHYSIODENS teeth and their micro and macro textures were completely preserved. This is a prerequisite that we set for prefabricated teeth. The double crown dentures for the upper jaw and the ceramic-veneered bridges for the lower jaw were delivered to the dental practice after a final check (Figs. 12 to 14).
Once in the patient's mouth, the upper jaw dentures demonstrated perfect sliding properties, easy insertion and removal, as well as a secure fit. The tooth-supported bridge in the lower front teeth area was permanently cemented, and the dual structure bridge was semi-permanently integrated. A wonderfully natural look! This is how the denture restorations looked in the patient's mouth (Figs. 15–17).
15. Integrated! Telescopic prosthesis in the upper jaw ...
16. ... and ceramic bridges in the lower jaw.
17. The denture restorations in the patient's mouth.
Summary
The combination of two different prosthetic concepts – double crown prostheses and dual structure bridges –resulted in harmony in terms of function and esthetics. The discerning patient received highly esthetic restorations in her upper and lower jaws. VITA PHYSIODENS premium teeth are the perfect counterpart for ceramic veneers in the lower jaw or naturally beautiful teeth. We have successfully mastered the balancing act between "prefabricated and individuality."
Highlight of the Individual Full Prosthetic – Unique Prosthetics that are Hand-Crafted and Hand-Layered with Imagination, Imitating Nature
Thomas Weiler, Master Dental Technician, Bocholt, Germany
Dr. Babak Varzideh, Bocholt, Germany
“So it is with man; the measure of the happiness he can attain is determined beforehand by his individuality,” remarked the famous philosopher and thinker, Arthur Schopenhauer. Today, more and more items are “off the shelf,” but there is an increasing number of patients who have internalized Schopenhauer’s thesis and desire absolute individuality for their dentures. This desire applies to all forms for restorative care, and not only for cosmetic veneered restorations, which are shown below, using a new, full prosthetic restoration. In close consultation with the discerning patient, all the material and artistic possibilities were rigorously exhausted in order to achieve the greatest possible, age-appropriate individuality.
Case study
About three months after the extraction of his remaining telescopic abutment teeth in the lower jaw, a 61-year-old patient presented in the practice for advice. The prosthesis was no longer viable without the anchoring in the lower jaw. Due to the bone resorption, the patient was presented with relining as a possible therapy. In general, however, the patient was dissatisfied with the esthetics of both prostheses. He thought the denture teeth were too dark. He complained about insufficient hold and disturbed phonetics (Fig. 1). During the clinical inspection, it was evident that the current setup did not line up with the center of the face. In the first quadrant, the teeth were exposed too far in the caudal direction, so that the laugh line appeared out of alignment (Fig. 2). The tooth axes of the maxillary incisors did not harmonize with the actual midline. In addition, the incisal edge progression between the middle and lateral incisors was too uniform, so the natural play of different sizing was lacking. The incisal edges in the lower jaw were highly rounded and did not correspond to the anatomy of functioning teeth (Fig. 3). The papillae were too long and too pointed, and the gingival anatomy was, in general, not simulated on the vestibular lip shield. For this reason, the patient felt uncomfortable when laughing.
Patient decision through visual consult
Based on the existing case documentation, the patient was shown the individual options currently offered by full dentures in the consultation. This allowed the individual details to be fully explained. The difference between a standard restoration and a personally tailored restoration with a customized lip shield, age-appropriate tooth morphology and characteristic staining quickly became clear. Informed and inspired by the presented patient cases, he decided on a completely new prosthetic restoration for the upper and lower jaw, where the individuality of an age-appropriate restoration could be attained. The patient specifically desired a lifelike reproduction of the vestibular gingival parts and an age-appropriate individualization of the teeth. The removable dentures should by more seamless and integrated. In general, the patient rejected a permanent restoration with implants. Based on the advice and visual impressions, the patient was able to make his own decision as to how he envisioned his new restoration. The more individual the dentures are required to be, the more important it is to respond in detail to specific patient wishes.
1. The patient was dissatisfied with his restoration.
2. In the first quadrants, the teeth were generally exposed too far in the caudal direction.
3. The incisal edges in the lower jaw were strongly rounded and did not appear natural.
The foundation of the work
Alginate impressions were used to make anatomical models for producing individual trays. From these, the mucodynamic impressions were carried out and the master models were produced. Registration templates were produced on the master models from light-curing plate material. The wax rims could then be positioned using the model analyses. As part of the jaw relation determination, the wax rims were optimized intraorally so that they provided an accurate orientation when set up in wax. The Camper’s plane was then registered with a face bow. Finally, the two registration templates were encoded. After the corresponding articulation of the master models, the setup in wax could be started (Fig. 4).
4. After patient-appropriate articulation of the master models, the setup was started.
Individual hand work
To do a setup according to BLP (Bio-Logic Prosthetic according to Dr. End), premium denture teeth from VITA PHYSIODENS were used. Especially when individual esthetics are required, the VITA PHYSIODENS Anteriors offer the advantage that the set is handmade. The three-dimensional anatomical layering with root, dentin and enamel materials repeatedly shows an individual character and a nuance-rich play of color and light. Each tooth is one of a kind. The anterior teeth provided a suitable basis to meet the patient’s need for individuality. In texture and morphology, the developers of the set of teeth based the design on real teeth, which is why the tooth axes, angular characteristics and length-width ratio automatically comply with the natural rules of dentition. Abrasion surfaces were incorporated as part of the setup in order to create an age-appropriate character. With this more or less pronounced modification, the anterior tooth set can reflect the entire age spectrum as needed. A slightly nested setup also provided authenticity. The true-to-life morphology of the VITA PHYSIODENS Posteriors made efficient placement in the posterior region possible, as the interlocking approximal surfaces ensured uncomplicated and rapid positioning. The anatomical occlusal surfaces – according to the physiological occlusion – led automatically to the simultaneous and uniform, point-like occlusal contacts. In this case, the setup of the second molars was omitted for reasons of space, which is normally an integral part of the BIO-Logical setup.
Anatomy in wax
The imitation of the mucogingival anatomy was meticulously taken into account, even during the wax try-in. At this stage, the patient should have an accurate idea of what the final result will be. The palatal ridges of the patient were also imitated for optimal phonetics and functional support when chewing food. The palatine ridges on the master model were molded with kneading silicone for this purpose and a key was made. With this silicone stamp, the palatal ridges could be transferred to the heated wax and then refined and smoothed. During the wax try-in, the patient was satisfied with the intermediate result achieved. On the basis of the setup, the possible individualizations and characterizations of the denture teeth were discussed once more with the patient, and his wishes recorded. Finally, images were made with the wax-up so that the patient and his immediate family and friends could privately compare the current restorations with the new situation in wax. After a brief time of reflection, he finally gave his approval for the implementation in acrylic. The two wax setups were reduced on the master models, and the situation fixed with a position-stable silicone key. The teeth were then removed and buffed and blasted on the composite surfaces to create a microretentive surface. The teeth were then repositioned in the silicone key and the composite surfaces chemically conditioned with VITACOLL adhesive. The bases were converted into polymer using a cold polymer, and then processed with an acrylic bur. The vestibular surfaces of the denture bases and the prefabricated teeth were then blasted with aluminum oxide (Fig. 5). In the upper jaw, the mesial and distal flanks of the middle incisors and the mesial flanks of the two lateral incisors were also reduced with an acrylic bur (Fig. 6, 7).
5. Upon implementation, the teeth and vestibular lip shield were blasted with aluminum oxide.
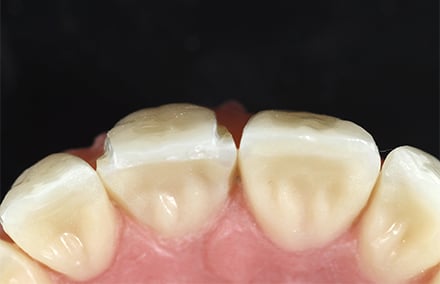
6. The mesial and distal flanks of artificial tooth 11, reduced for individualization.
7. The incisal view from the top shows the dimensioning of the controlled reduction.
Individual play of light
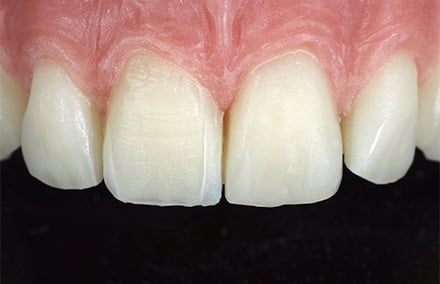
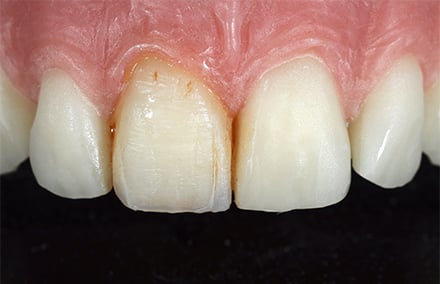
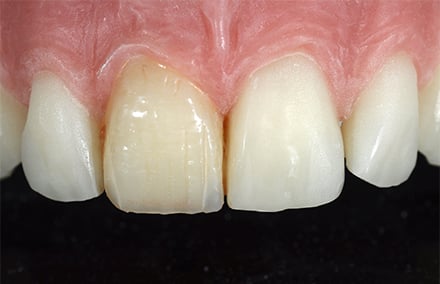
The vestibular surfaces of the teeth and labial shield were conditioned with VITA VM LC MODELLING LIQUID. Individualization was performed with the light-curing and thixotropic composite veneering system VITA VM LC flow and the associated stains PAINT (both from VITA Zahnfabrik, Bad Säckingen, Germany). First, additional light effects were created on the reduced flanks of the upper incisors with balanced, alternating layers of EFFECT ENAMEL 9 (bluish-translucent), transparent WINDOW (WIN) and ENAMEL (END) (Fig. 8, 9). After light curing these individualizations, VITA VM LC PAINT 15 (maroon) was used to apply a brownish characterization to the approximal and cervical areas of the abraded incisal edges and palatal pits (Fig. 10, 11). Delicate cracks were indicated using the same stains and VITA VM LC flow on the transitions between the teeth. The restoration was designed as it had previously been discussed in detail with the patient, using the photographs as a guide. After fixation of the characterizations through polymerization, the teeth and the sulcular junctions were sealed with light-curing OPTIGLACE GC (GC, Tokyo, Japan) (Fig. 12, 13).
8. Individualization with the thixotropic composite veneering system VITA VM LC flow.
9. After the light curing of the individualized marginal ridges, the characterization could be started.
10. A fine hairline crack, as well as cervical and approximal discolorations, were created.
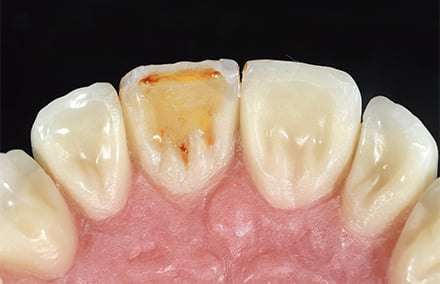
11. The age-appropriate shortened incisal edge and the palatal dimples were also characterized.
12. After light-curing fixation of the stain, tooth 11 was sealed with glaze.
13. The lateral perspective shows the harmony between morphology and characterization.
Individual mucogingival anatomy
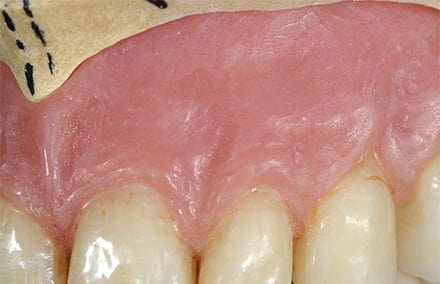
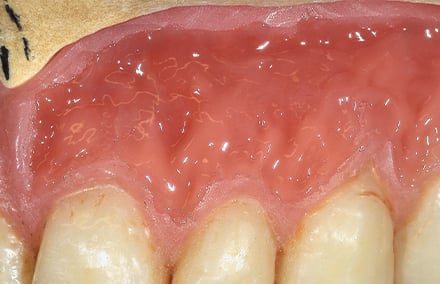
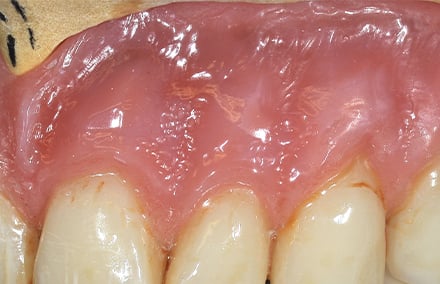
When designing the mucogingival anatomy, care had already been taken to irregularly apply VITA VM LC flow GINGIVA in order to achieve a natural effect. The alveolar mucosa had been created up to the mucogingival border with brown-red GINGIVA 4. In the region of the attached gingiva on the alveolar processes, lighter GINGIVA 1 (old pink) was applied to achieve a three-dimensional depth effect. The labial frenulum was also imitated with GINGIVA 1. After the final polymerization, the vestibular labial shield was worked out, according to the anatomical model with irregular stippling. In doing so, care was taken not to apply the stippling too deeply, in order to ensure easy cleaning with a toothbrush and to prevent the formation of soil niches. In order not to remove the characterizations with the polishing, the restorations were very gently finalized with goat hairbrushes, buffing and polishing paste (Fig. 14 - 17).
14. After all the anterior teeth had been modified, the vestibular labial shield was individualized.
15. The alveolar mucosa was created with brown-red GINGIVA 4, up to the mucogingival margin.
16. The lighter GINGIVA 1 (old pink) was applied in the area of the attached gingiva.
17. With minimal finishing, an irregular stippling has been applied.
Clinical result and conclusion
The more individualized the full prosthetic work is, the more important it is to actively involve the patient in the planning of the final restoration. In this case, photo documentation of other full prosthetic work proved to be an effective way of visually communicating to the patient how individualized today’s full prosthetics can be. As an individual, customized setup, VITA PHYSIODENS manufactured by VITA Zahnfabrik, in combination with the multi-faceted composite veneering system, VITA VM LC flow, makes it possible to fulfill the patient’s wishes with high quality materials. Lastly, imagination, as well as dental and artistic skills, were critical in creating two restorations that could not be distinguished from natural dentition. The work matched the age, character and lifestyle of the patient and harmoniously fit into the big picture. Absolute individuality in this case was the recipe for success for a satisfied and happy patient.
18. The finished and polished full prosthetic work in the articulator
19. Even on the models, the work appeared very natural.
20. The finished restoration prior to incorporation in the patient’s mouth.
21. The view from the side shows the three-dimensional depth effect of the mucogingival anatomy.
22. The modified teeth in the esthetic zone with a lifelike play of shade and light.
23. The individual restorations work together to mimic nature.
24. In the top view, the characterized dimples and fissures become visible on the prefabricated teeth.
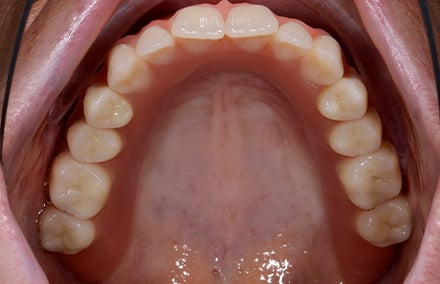
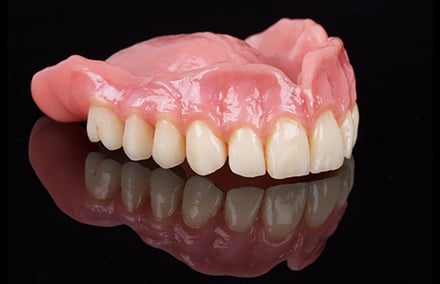
25. The finished full maxillary prosthesis.
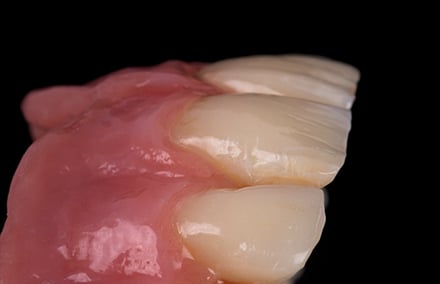
26. The red and white interplay in the esthetic zone.
27. The individualized and characterized anterior teeth…
28. … also create an absolutely natural impression in the detailed view.
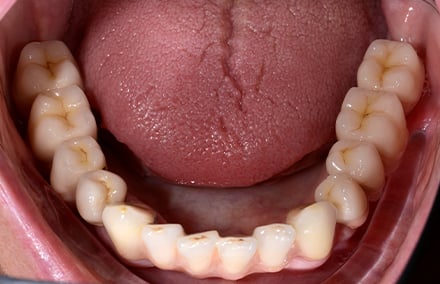
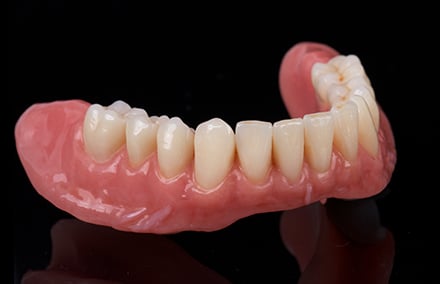
29. The finished mandibular full prosthesis.
30. A discreet asymmetry of the gingiva creates a natural impression.
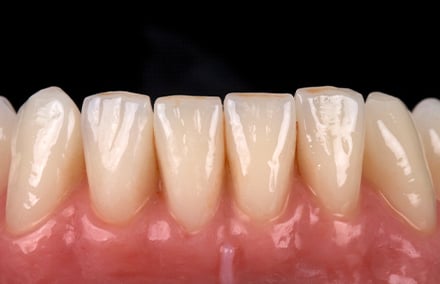
31. The age-appropriate facets and fissures were also characterized in the lower jaw with brownish stains.
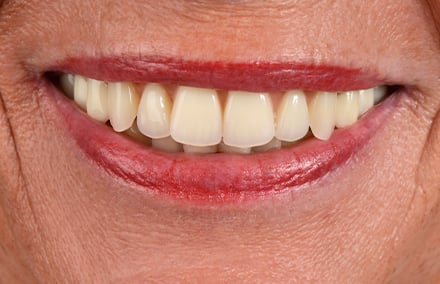
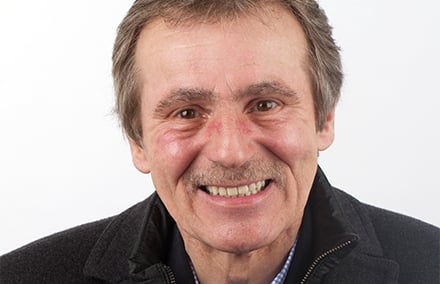
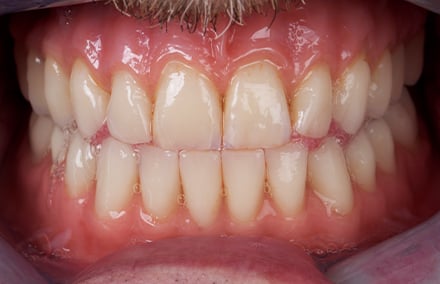
32. When incorporated, the restorations gave the impression of natural dentition.
33. The incorporated facets on the incisors functionally harmonized in the protrusion.
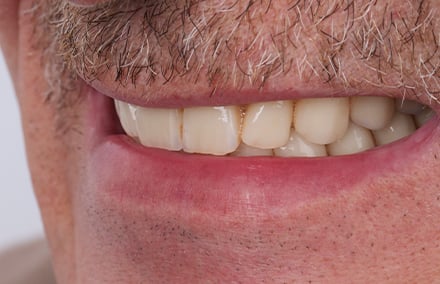
34. The incisal edges of the maxillary incisors fit the lip line.
Stay ahead of the game with the VITA ACADEMY.
Get started now: Discover our wide range of courses and webinars. Register today and secure your exclusive place! Register now!